It's beginning to look a lot like Christmas, Heeere in Emma Kate's house!
I promise, I will be singing Christmas carols all month. Especially while I work on all the Christmas crafts I have planned.
So much craft supplies!!
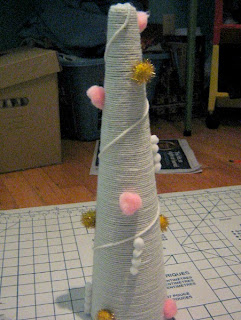
Today shall be marked as Crafting Day 1. My first project? Yarn and pom pom mini Christmas trees!
I saw a picture on tumblr, while browsing through posts tagged "DIY". Unfortunately, I can't find that photo now, but my trees look pretty similar.
I went to the craft store today and I bought 3 different colours of yarn, and 3 Styrofoam cones, all different sizes.
I started with the largest cone, and my largest ball of yarn.
I started at the top of the cone, gluing with a hot glue gun as needed.
I jut kept winding and winding and winding the yarn around; making sure to keep the rows close together. It actually didn't take too long before I was really making progress.
As I got to the very last few rows, along the bottom edge, I had to use a lot more glue to keep that edge nice and tight and smooth. I guess I could've just stopped early and then chopped off the excess... But I'm stubborn. When I finished entirely wrapping the cone, I wrapped the yarn back up to the top, like a garland, and glued it down, then cut the yarn loose from the roll.
Now comes the fun part!! Adding the pom-poms!
You can arrange the pom-poms however you like. I once read that a good way to arrange ornaments on a tree is by hanging them is a sort of zig-zag pattern. So I applied that philosophy here. I glued on a few small pom poms in contrasting colours to the yarn, and then I added a few columns of mini, white pom-poms.
And I finished it off with a glittery, winged tree-topper!
After I finished this one, I made two more, and arranged them in a cluster, next to my mom's favourite chair.


love the idea, I'll see what I can do with it :)
ReplyDelete