Monday, April 8, 2013

Reversible Novelty Vest!

Here, is the finest example, yet, of my tailoring skills!


I'm actually so proud of this vest! I made is for a teacher friend of my mom's, who wears fun, kitschy vests when teaching his kindergarten class.  But the lady who used to make his vests for him retired. So he figured he'd ask me if I'd mind making this one. Of course, I said I would love to!

I had to draft the pattern from a vest he already had, which was a long process of tracing, and measuring, and marking. And taping together sheets of printer paper.

Then, when I cut out the pieces of green fabric,


I noticed that the colours on both right and wrong sides were equally as intense. So it was hard to tell the difference. Because of that, I accidentally sewed the back piece on backwards. The letters were backwards!  We can't have children learning backwards letters!  So I patched on new letters, the right way around.  I actually like the effect. Not all the letters have been patched over, and so it creates some really interesting, and subtle dimension.

Then I cut out the air plane fabric. The teacher originally gave me a lighter blue fabric with larger, more realistic planes on it. But, once again, I wasn't paying attention, and I cut out the front panels, with the planes upside down.  

So we bought new air plane fabric.


The planes go in all directions. So I can't mess it up. 

I sewed the two sides together, inside out, turned it right-way out, and then folded under the seam allowance at the opening, and top stitched it shut. I did the same to finish the arm holes. 

I even top stitched along the seams, to keep the allowances facing the right direction!

Again, like I said, REALLY proud of myself!

Friday, March 29, 2013

Silk Dyed Eggs!

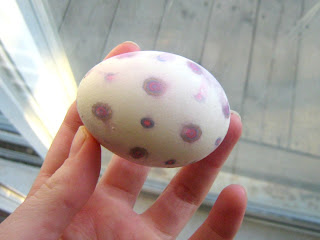
So, this past week, I've been looking up some different ways to decorate Easter Eggs. I came across this wonderful tutorial on ourbestbites.com. You take ugly silk ties (or any other ugly patterned silk) and wrap it around eggs, then boil them, and the pattern transfers onto the shell!

As A fun afternoon activity, my boyfriend and I decided to try it out!

But not before Cain tried to balance as many eggs as he could.


Now, since I pretty much suck at following, or even reading, instructions, I kinda just went ahead and did this project my own way, first, hollowing out two eggs, and wrapping them in fabric I was pretty sure wasn't silk, but I wanted to try it anyway.


What I hadn't planned on was that hollow egg shells float. So we conjured up this make-shift contraption to hold them under the water.


Those ones didn't turn out. They came out of the water just as white as they were, going in. I plan to paint them later.

So then we tried the silk ones!


Even before we unwrapped them, we were pretty sure something had happened, 'cause the water looked like this.


We waited for the eggs to cool and dry, and then...


TA- DAAA!!!

The eggs are so beautiful!! I was practically giggling, I was so pleased!


The tutorial was right; ugly ties make beautiful eggs!

I just wish they could've been hollowed out, so I could display them.


Thursday, March 14, 2013

Blueberry Pancakes!

I'm becoming quite the cook, if I do say so myself.

Case in point: I made blueberry pancakes from scratch!


I DID follow a recipe. But even following a recipe I don't always succeed. So I'm still very proud of myself.

I used a mixture of all-purpose and whole wheat flour, and I used frozen blueberries.

I made enough for everyone to have a couple! And I served them with sliced almonds, and green grapes (and maple syrup, of course).

 
The best part of this recipe is that it's really healthy. These pancakes were filling, but didn't leave you feeling bloated or like you'd eaten a dessert. I can't wait to make them again!

Monday, March 11, 2013

I'm on Etsy!

So, I know I've been MIA the past few weeks. The reason is that I've been working hard on a lot of different things, including setting up a shop on etsy.

I'm going to be selling a variety of products; handmade accessories and clothing that are original designs and some refashioned/recycled pieces.


These cuffs are recycled denim.

As well as original art work and home decor pieces. Also, I'll be selling the occaissional vintage item, as I find them.

Here's the link to my shop. Any feed back would be great!


Friday, February 22, 2013

Hot Pink, Shimmering Gold And Gothic Romance.

Here we are. It's Thursday. London Fashion Week is done and we're onto Milan Fashion week. Celebrities are being spotted, and street style is being  photographed. Designers continue to show a bit of everything, classy to wacky. And I'm loving it!

Unfortunately, I live in Canada and I'm broke, so I can't actually go to London or Milan. But I can experience it from afar, via the internet, and a wonderful website; style.com, where you can see full collections from every fashion show, right away. The fall/winter collections for this year are stunning. And I've noticed a few trends that I can't wait to try out!

One trend is a colour that's been lighting up runways, left, right, and centre!  Hot pink is hot for fall and I for one am looking forward to injecting a splash of fluorescent femininity into my wardrobe.


But what goes with hot pink other than the obvious choices of black and white? Well,Twenty 8 Twelve, shows that purple pairs quite nicely when done in  an equally vibrant shade.


What I would also put with hot pink (because, why not?) would be something in metallic gold! And gold has be ALL OVER the runways lately. We've seen it as hardware on skirts and bags at Burberry Prorsum;


Dramatic evening gowns by Giles;


And elegant embroidery from Marchesa.


Of course, there must be a contrast to these brighter looks, and there is.  Also gracing the catwalk at London  Fashion Week were quite a few dark, gothic looks.


This is what I love about fashion; with every season, there's so much creativity and inspiration!  And there's always great new trends! 

Tuesday, February 19, 2013

Brand New Bows!

A couple of years ago, for Christmas, I received a cute pair of black, satin slippers, with little bows on them.

A few months ago, on of those bows fell off, and I lost it.

So, I made new bows for my slippers.

I used scissors, a needle and thread, and 2 equal lengths of black satin ribbon.


The one slipper had already lost it's bow, but I had to take the bow off of the other.  


I tied ribbons into bows, and adjusted them until they looked the way I wanted them to; nice and full, and even.


Then, I sewed from the inside of the slipper, out,


I stuck the needle through the centre of the bow,


And I sewed the bow down with about 3 or 4 stitches, until I was satisfied that it was secure.

Then I did the same with the second slipper.


And VOILA!  I actually like these bows much better than the bows that the slippers came with.  These are much bigger and more feminine.


Monday, February 18, 2013

Beautifying Blemishes

A stain is to a garment as a really bad pimple is to a face.  It's obvious, distracting, and sometimes just gross.

But, unlike pimples, not all stains go away.

Such was the case with one of my favourite summer dresses.


You can't really tell from this photo, but this dress has (had?) a few fairly visible ink stains on the skirt and the bodice.


Stains 1, 2, and 3, respectively.

I tried every different tip I could find on how to remove ink from fabric but the stains had dried and weren't going to budge. 

Then, I came across a tip, in a magazine at school, that suggested fixing holes and rips by covering them with embroidery.  I though that would work perfectly to cover up stains, as well!

So, sketched out some floral motifs; 


And finally decided on two that I liked.


Keep in mind, as I tell you about my project; 


So, I spread part of the skirt over my embroidery hoop, with the stain sitting dead in the centre.  I drew one of the motifs over top, and I began.

First, the stems and leaves, in a dark, olive green.


Then, some princess-pink blossoms.


And a white french knot in the centre.


I also started putting flowers elsewhere on the skirt.


For the bodice I decided I'd use multiple, tiny french knots.  So far, I've done three.


But the entire bodice WILL be covered in little dots. It WILL be!

This is how the dress looks now.


Not a HUGE difference, I know. I only added three tiny dots and a few small  flowers. And one of those flowers is hidden behind a pleat. But this is a work in progress. I plan on doing about an hour of embroidery each night and I should have it all ready in time for when the warm weather returns.